Friday, September 10, 2010

How to Get Decent Eclipse Based XML Editor Without Downloading Whole Eclipse SDK and Web Tools Binaries

If you're not going to develop Java application, plug-in or debug Eclipse based applications there is no reason to download whole bunch of archives with all eclipse features you're never going to use. So to keep your XML Editor small and free from UI clattering follow this simple steps:
  • Download Eclipse Platform 3.6.X from http://www.eclipse.org, which is only 50M instead of 170M for Classic Eclipse SDK
  • Unpack it somewhere to your local file system (this folder is referenced as ${eclipse} below in this article)
  • Start it by executing ${eclipse}/eclipse or ${eclipse}/eclipse.exe which depends on your operation system
  • Select folder that is going to be used to keep your stuff like new projects, if you're going to create something
  • Open "Install" dialog using "Help->Install New Software..." in bar menu
  • Install "Web, XML, and Java EE Development->Eclipse XML Editors and Tools" form "Helios - http://download.eclipse.org/releases/helios/" update site
  • Wait while Eclipse is downloaded selected software
  • Restart Eclipse when downloading and installation are finished and Eclipse asks you what you want to do
You're done with installation and now have fully functional XML editor with the lots features like: templates, content assist and validation based on DTD or XML Schema.

Thursday, July 29, 2010

Running RHEL 5 as a Guest Under Ubuntu 10.04 Lucid

I recently tried to run RHEL5 as guest under Ubuntu Linux 10.04 Lucid and my experiment ended with weird messages like shown below. It just popped up during running kvm and there were no way to fix it but start qemu without kvm. It helped but was so slow that almost unusable unless you have plenty of time to wait.
MP-BIOS bug: 8254 timer not connected to IO-APIC
After several attempts to fix it and get working RHEL5 for testing I found this post which has several options that works for test instance of RHEL5. It turned out simple kvm options like
-no-kvm-irqchip
-no-kvm-pit.    
can be used to make it boots like expected and it still works pretty fast versus -nokvm option.

Monday, April 26, 2010

Some CAPTCHA Says to Me: "You're not a human"

CAPTCHA is "Completely Automated Public Turing test to tell Computers and Humans Apart" as Wikipedia says here. I failed for example to recognize this sequence generated by Google and that's not the only example ;)

Friday, April 16, 2010

JDT Uses Jikes Parser Generator (jikespg)

Eclipse JDT Uses Jikes PG to generate Java Parser as it declared here in developer resources [1]. It is implements techniques that allow to reduce memory consumption, to increase speed and support automatic error recovery.
Follow the links below to get it compiled, if JDT parser generation fails with something looking like this
eskimo@dgolovin-desktop:~/Projects/jbds-build/addition/org.eclipse.jdt.core/grammar$ ~/bin/jikespg java.g

 IBM Research Jikes Parser Generator            Mon Apr 26 16:06:10 2010
%OPTIONS ACTION, AN=JavaAction.java, GP=java, 
%OPTIONS FILE-PREFIX=java, ESCAPE=$, PREFIX=TokenName, OUTPUT-SIZE=125 ,
%OPTIONS NOGOTO-DEFAULT, SINGLE-PRODUCTIONS, LALR=1 , TABLE, 
%OPTIONS ERROR_MAPS 
%OPTIONS first follow
%OPTIONS TRACE=FULL ,
%OPTIONS VERBOSE
%OPTIONS DEFERRED
%OPTIONS NAMES=MAX
%OPTIONS SCOPES
Options in effect:
    ACTION  ACTFILE-NAME=JavaAction.java  BLOCKB=/.  BLOCKE=./  BYTE  CONFLICTS
    DEFAULT=5  NODEBUG  DEFERRED  NOEDIT  ERROR-MAPS  ESCAPE=$  
    FILE-PREFIX=java  FIRST  FOLLOW  GENERATE-PARSER=JAVA  NOGOTO-DEFAULT  
    HACTFILE-NAME=javahdr.java  HBLOCKB=/:  HBLOCKE=:/  LALR=1  LIST  
    MAX-DISTANCE=30  MIN-DISTANCE=3  NAMES=MAXIMUM  NONT-CHECK  ORMARK=|  
    OUTPUT-SIZE=125  PREFIX=TokenName  READ-REDUCE  SCOPES  NOSHIFT-DEFAULT  
    SINGLE-PRODUCTIONS  STACK-SIZE=128  STATES  SUFFIX=  TABLE=SPACE  
    TRACE=FULL  VERBOSE  WARNINGS  XREF  

*** buffer overflow detected ***: /home/eskimo/bin/jikespg terminated
======= Backtrace: =========
/lib/tls/i686/cmov/libc.so.6(__fortify_fail+0x48)[0xb7821ed8]
/lib/tls/i686/cmov/libc.so.6[0xb7820f10]
/lib/tls/i686/cmov/libc.so.6[0xb782023a]
/home/eskimo/bin/jikespg[0x805be3a]
/home/eskimo/bin/jikespg[0x805cd7e]
/home/eskimo/bin/jikespg[0x805d4f6]
/home/eskimo/bin/jikespg[0x805dc9d]
/home/eskimo/bin/jikespg[0x805f850]
/lib/tls/i686/cmov/libc.so.6(__libc_start_main+0xe6)[0xb7757b56]
/home/eskimo/bin/jikespg[0x8048bc1]
======= Memory map: ========
08048000-08089000 r-xp 00000000 08:03 9437834    /home/eskimo/bin/jikespg
08089000-0808a000 r--p 00040000 08:03 9437834    /home/eskimo/bin/jikespg
0808a000-0808b000 rw-p 00041000 08:03 9437834    /home/eskimo/bin/jikespg
0808b000-0808c000 rw-p 00000000 00:00 0 
086e6000-0872a000 rw-p 00000000 00:00 0          [heap]
b7710000-b772c000 r-xp 00000000 08:02 9088       /lib/libgcc_s.so.1
b772c000-b772d000 r--p 0001b000 08:02 9088       /lib/libgcc_s.so.1
b772d000-b772e000 rw-p 0001c000 08:02 9088       /lib/libgcc_s.so.1
b7740000-b7741000 rw-p 00000000 00:00 0 
b7741000-b787f000 r-xp 00000000 08:02 9011       /lib/tls/i686/cmov/libc-2.10.1.so
b787f000-b7880000 ---p 0013e000 08:02 9011       /lib/tls/i686/cmov/libc-2.10.1.so
b7880000-b7882000 r--p 0013e000 08:02 9011       /lib/tls/i686/cmov/libc-2.10.1.so
b7882000-b7883000 rw-p 00140000 08:02 9011       /lib/tls/i686/cmov/libc-2.10.1.so
b7883000-b7886000 rw-p 00000000 00:00 0 
b7895000-b789a000 rw-p 00000000 00:00 0 
b789a000-b789b000 r-xp 00000000 00:00 0          [vdso]
b789b000-b78b6000 r-xp 00000000 08:02 22970      /lib/ld-2.10.1.so
b78b6000-b78b7000 r--p 0001a000 08:02 22970      /lib/ld-2.10.1.so
b78b7000-b78b8000 rw-p 0001b000 08:02 22970      /lib/ld-2.10.1.so
bfc3f000-bfc54000 rw-p 00000000 00:00 0          [stack]
Aborted
remove optimization flag
-O1
from
jikespg/src/Makefile
and compile it again. It should be enough to fix it and get parser generated. Output for generating JDT parser based on java.g grammar should look like this:
eskimo@dgolovin-desktop:~/Projects/jbds-build/addition/org.eclipse.jdt.core/grammar$ ~/bin/jikespg java.g

 IBM Research Jikes Parser Generator            Mon Apr 26 16:18:22 2010
%OPTIONS ACTION, AN=JavaAction.java, GP=java, 
%OPTIONS FILE-PREFIX=java, ESCAPE=$, PREFIX=TokenName, OUTPUT-SIZE=125 ,
%OPTIONS NOGOTO-DEFAULT, SINGLE-PRODUCTIONS, LALR=1 , TABLE, 
%OPTIONS ERROR_MAPS 
%OPTIONS first follow
%OPTIONS TRACE=FULL ,
%OPTIONS VERBOSE
%OPTIONS DEFERRED
%OPTIONS NAMES=MAX
%OPTIONS SCOPES
Options in effect:
    ACTION  ACTFILE-NAME=JavaAction.java  BLOCKB=/.  BLOCKE=./  BYTE  CONFLICTS
    DEFAULT=5  NODEBUG  DEFERRED  NOEDIT  ERROR-MAPS  ESCAPE=$  
    FILE-PREFIX=java  FIRST  FOLLOW  GENERATE-PARSER=JAVA  NOGOTO-DEFAULT  
    HACTFILE-NAME=javahdr.java  HBLOCKB=/:  HBLOCKE=:/  LALR=1  LIST  
    MAX-DISTANCE=30  MIN-DISTANCE=3  NAMES=MAXIMUM  NONT-CHECK  ORMARK=|  
    OUTPUT-SIZE=125  PREFIX=TokenName  READ-REDUCE  SCOPES  NOSHIFT-DEFAULT  
    SINGLE-PRODUCTIONS  STACK-SIZE=128  STATES  SUFFIX=  TABLE=SPACE  
    TRACE=FULL  VERBOSE  WARNINGS  XREF  

*** The following Terminals are useless: 
        const  goto  

This grammar is LALR(1).

Number of Terminals: 110
Number of Nonterminals: 312
Number of Productions: 704
Number of Single Productions: 232
Number of Items: 2203
Number of Scopes: 134
Number of States: 970
Number of Shift actions: 6060
Number of Goto actions: 7523
Number of Shift/Reduce actions: 590
Number of Goto/Reduce actions: 1047
Number of Reduce actions: 14139
Number of Shift-Reduce conflicts: 0
Number of Reduce-Reduce conflicts: 0

Length of base Action Table: 12223
Number of entries in base Action Table: 9540
Percentage of increase: 28.1%
Storage required for base Tables: 24446 Bytes, 24K
Storage required for Rules: 2109 Bytes
Number of unique terminal states: 743
Number of Shift actions saved by merging: 4084
Number of Reduce actions saved by merging: 912
Number of Reduce saved by default: 9127

Length of Terminal Check Table: 8110
Length of Terminal Action Table: 8072
Number of entries in Terminal Action Table: 7409
Percentage of increase: 8.9%
Storage required for Terminal Tables: 24254 Bytes, 24K
Total storage required for Tables: 48700 Bytes, 48K


Actions in Compressed Tables:
     Number of Shifts: 2241
     Number of Shift/Reduces: 325
     Number of Gotos: 7523
     Number of Goto/Reduces: 1047
     Number of Reduces: 4100
     Number of Defaults: 491

Error maps storage:
    Storage required for ACTION_SYMBOLS_BASE map: 1940 Bytes
    Storage required for ACTION_SYMBOLS_RANGE map: 1707 Bytes
    Storage required for NACTION_SYMBOLS_BASE map: 1940 Bytes
    Storage required for NACTION_SYMBOLS_RANGE map: 984 Bytes
    Storage required for TERMINAL_INDEX map: 220 Bytes
    Storage required for NON_TERMINAL_INDEX map: 626 Bytes
    Storage required for STRING_BUFFER map: 12328 Bytes

***Warning: Base Check vector contains value > 127. 16-bit words used.
Escaped symbol $eof is an invalid C variable.

Escaped symbol $error is an invalid C variable.
Links:

Build XULRunner Eclipse p2 Repo with Tycho

Prerequisites

  • Maven 3.0.0.alpha7
  • Scala
  • Subversive command line client
  • Java SE 1.5+

Environment used to write this article

eskimo@desktop:~/Projects/jbt-xulrunner$ ~/Java/apache-maven-3.0-alpha-7/bin/mvn -v
Apache Maven 3.0-alpha-7 (r921173; 2010-03-09 14:31:07-0800)
Java version: 1.6.0_0
Java home: /usr/lib/jvm/java-6-openjdk/jre
Default locale: en_US, platform encoding: UTF-8
OS name: "linux" version: "2.6.31-21-generic-pae" arch: "i386" Family: "unix"

It is very simple process because Tycho does all work for you. All you need is to follow simple steps below.

Create separate folder for XULRunner build and make it current

eskimo@desktop:~/Projects$ mkdir jbt-xulrunner
eskimo@desktop:~/Projects$ cd jbt-xulrunner

Checkout XULRunner component from JBoss Tools Subversion repository. You need to use modular_build branch. It is temporary branch that is going to be merged to trunk next week, but I think it will stay here for a while after merge is happened.

First root only should be checked out from branch to avoid pulling out whole gigantic repository.

eskimo@desktop:~/Projects/jbt-xulrunner$ svn co --depth=files https://anonsvn.jboss.org/repos/jbosstools/branches/modular_build .

Then the same should be done for xulrunner component

eskimo@desktop:~/Projects/jbt-xulrunner$ svn co https://anonsvn.jboss.org/repos/jbosstools/branches/modular_build/xulrunner

After steps above it gets us to the JBoss Tools repository structure but with the only component.

Next step is pom.xml files generation, because this branch contains only parent-pom.xml in root. Scala is used to do it.

eskimo@desktop:~/Projects/jbt-xulrunner$ scala genpom.scala
Generate Agg for ./xulrunner
Modules: 8 Aggregator: 4

Now working copy is ready to build XULRunner Eclipse Feature and generate p2-repo for it. Make sure you are using maven3.

eskimo@desktop:~/Projects/jbt-xulrunner$ mvn install

In the end it should look like

[INFO] ------------------------------------------------------------------------
[INFO] Reactor Summary:
[INFO]
[INFO] trunk ............................................. SUCCESS [0.639s]
[INFO] xulrunner.all ..................................... SUCCESS [0.034s]
[INFO] xulrunner.plugins ................................. SUCCESS [0.006s]
[INFO] org.mozilla.xulrunner.cocoa.macosx ................ SUCCESS [5.637s]
[INFO] org.mozilla.xulrunner.gtk.linux.x86 ............... SUCCESS [3.595s]
[INFO] org.mozilla.xpcom ................................. SUCCESS [0.455s]
[INFO] org.mozilla.xulrunner.win32.win32.x86 ............. SUCCESS [3.238s]
[INFO] org.mozilla.xulrunner.gtk.linux.x86_64 ............ SUCCESS [4.083s]
[INFO] org.mozilla.xulrunner.carbon.macosx ............... SUCCESS [3.721s]
[INFO] site.all .......................................... SUCCESS [0.203s]
[INFO] org.mozilla.xulrunner.feature ..................... SUCCESS [0.563s]
[INFO] org.mozilla.xpcom.feature ......................... SUCCESS [0.571s]
[INFO] org.mozilla.xulrunner.site ........................ SUCCESS [4.045s]
[INFO] xulrunner.features ................................ SUCCESS [0.024s]
[INFO] ------------------------------------------------------------------------
[INFO] BUILD SUCCESS
[INFO] ------------------------------------------------------------------------
[INFO] Total time: 1:03.643s
[INFO] Finished at: Fri Apr 16 10:18:01 PDT 2010
[INFO] Final Memory: 89M/195M
[INFO] ------------------------------------------------------------------------

After that XULRunner Feature can be installed using p2repo from

xulrunner/site/org.mozilla.xulrunner.site/target/site

It should look in Eclipse Update dialog like on images below

Wednesday, April 14, 2010

Using Tab Window Manager with VNC in Automatic UI testing

By default Ubuntu 9.10 - the Karmic Koala - using twm windows manager for displays created by vncserver command. But twm with default configuration requests user to select new window location by mouse and waited until that happened. It is real problem when you're trying to run UI tests and UI applications are started by build script. With default twm settings your testing session just hangs at point of creating window and you have to open display where your tests are running and make that damn click to keep your tests rolling it is Ok if you have one window and long running tests, but it is not working if your UI application starts many times during testing.

twm window manager allows to control this behavior by RandomPlacement variable in $HOME/.twmrc configuration file. To let your tests go without your attention just add line.

RandomPlacement

in your existing .twmrc file or create new one see [1] for other configuration parameters.

If that doesn't work you probably do not have twm installed by default, I faced that problem. It looked like everything is fine but I had no title bars for windows opened in vnc session. To fix that just install twn window manager using your favorite way to do it. I did it by

sudo apt-get install twm

After restarting vncserver everything is working like a charm.

[1] - Tab Window Manager Manual - http://www.x.org/archive/X11R6.8.0/doc/twm.1.html

Tuesday, April 13, 2010

Get Things Done with Tycho

Tycho is real Magic Wand for build engineers who supports Eclipse based projects. It just gets things done in minutes instead of weeks no matter what is size of your project. it just let it be built/tested in any way you want it:
- build and test everything at once
- build only what you needed piece by piece
It also lets any member of your team do the same and verify they local changes before commit them in source version control repository. It saves build server processor time and make continuous integration easier.

In reference to: tycho: Home (view on Google Sidewiki)

Remote Debugging for Eclipse Test Plugin Running by Tycho

When I report an issue in bug tracking system about a nightly build's JUnit test error I usually get simple answer that it is supposed to be working because it is working on developers workstation. After that routine conversation starts and it turns out that tests were running from development environment under Eclipse. Here I usually have to explain again and again that's not the same running tests from development environment and in build.

The right way to make yourself sure your tests will work in most cases without errors in nightly build is to start tests the same way as nightly build does. It was not easy for JBoss Tools tests until we created experimental branch and switched to Maven Tycho project. That means it is fairly easy to run tests now. Basically you need to change current directory and execute maven install goal. If it runs in development environment and in maven your tests are good and in most cases it should be fine in nightly build. Problems begin if it runs in development environment but it doesn't in maven. In this scenario you need to debug tests running in Tycho somehow and fix it. Fortunately it can be done using Java remote debugging support.

First of all you need to be sure you have built your sources you're going to debug and there is no differences between .java and .class files. If you're going find problem from previous build just get right tagged version and build it before debugging session.

Then open pom.xml for your Eclipse Test Plug-in and add Java VM arguments like it shown below (actual port numbers, server names and other parameters may be different, it depends from your environment)


   org.sonatype.tycho
      maven-osgi-test-plugin
      ${tycho-version}
      
      -Xdebug -Xrunjdwp:transport=dt_socket,address=8001,server=y,suspend=y


This snipped configured for remote debugging in OpenJDK 6, if your is different you might need to read [1] and configure it right for your java version.

Configure java projects with sources you're going to debug in Eclipse and create Remote Java Application configuration in Eclipse Debug Configuration dialog. Fill 'host' and 'port' fields with the same values from pom.xml argLine element. Press Apply button to save your changes and start your test plug-in from terminal like

$mvn install

It will go through build process and finally you ll see something like

[INFO] Expected eclipse log file: /home/eskimo/Projects/jbt-modular/jst/tests/org.jboss.tools.jst.web.kb.test/target/work/data/.metadata/.log
[INFO] Command line:
/bin/sh -c cd /home/eskimo/Projects/jbt-modular/jst/tests/org.jboss.tools.jst.web.kb.test && /usr/lib/jvm/java-6-openjdk/jre/bin/java -Dosgi.noShutdown=false -Dosgi.os=linux -Dosgi.ws=gtk -Dosgi.arch=x86 -agentlib:jdwp=transport=dt_socket,address=8001,server=y,suspend=y -jar /home/eskimo/.m2/repository/p2/osgi/bundle/org.eclipse.equinox.launcher/1.0.201.R35x_v20090715/org.eclipse.equinox.launcher-1.0.201.R35x_v20090715.jar -data /home/eskimo/Projects/jbt-modular/jst/tests/org.jboss.tools.jst.web.kb.test/target/work/data -dev file:/home/eskimo/Projects/jbt-modular/jst/tests/org.jboss.tools.jst.web.kb.test/target/dev.properties -install /home/eskimo/Projects/jbt-modular/jst/tests/org.jboss.tools.jst.web.kb.test/target/work -configuration /home/eskimo/Projects/jbt-modular/jst/tests/org.jboss.tools.jst.web.kb.test/target/work/configuration -application org.codehaus.tycho.surefire.osgibooter.uitest -testproperties /home/eskimo/Projects/jbt-modular/jst/tests/org.jboss.tools.jst.web.kb.test/target/surefire.properties
Listening for transport dt_socket at address: 8001

At this point build is waiting for you to attach remote debugger to the process because of using

suspend=y

in argLine element of your pom.xml file. So you need to return to eclipse and hit 'Debug' button in dialog opened before.

Build will continue at this point and stop on your break points so you can find out what is wrong with tests during nightly build.

[1] Java Platform Debugger Architecture - http://java.sun.com/javase/technologies/core/toolsapis/jpda/#Invocation

Tuesday, April 6, 2010

How to Use HSQL Database With JBossTools Right Way

There is no perfect software, there is always something you need to know to get things done. Here is an example, an article how to get HSQL rocks in JBoss Tools.

in reference to:

"How to Use HSQL Database With JBossTools Right Way"
- How to Use HSQL Database With JBossTools Right Way - JBoss Community (view on Google Sidewiki)

JBoss Tools Official IRC Chat Log

This page contains full log for official JBoss Tools IRC chat. What is this chat for? It is dedicated for development discussions, but you can get there and ask any technical question about JBoss Tools from why something is not working to I have an idea and I want to make that happend in next release

in reference to: jbosstools IRC logs [April 7 - 2010] (view on Google Sidewiki)

Eclipse Plug-ins for JBoss and related Technology

A lot of helpful information about JBoss Tools and related technologies. You can find here: downloads and updates, documentation, screen-casts, blogs, project activity info and many other resources.

in reference to:

"Eclipse Plugins for JBoss and related Technology" - JBoss Tools | Overview - JBoss Community (view on Google Sidewiki)

JBoss Tools User Forum

All you want to know about JBoss Tools project :) This forum is the best place:

  • to ask question about tools features;
  • to request new feature;
  • to get advice about using tools right way;
  • to get help with issues you got in your installation;
  • to get help with issue reporting and get your issue fixed;
  • to find a way to use tools for your project;
  • to influence to next version's functionality;
  • to get in touch with development team.

Your posts are very welcome :)

in reference to:

- Space: JBoss Tools - JBoss Community (view on Google Sidewiki)

Thursday, April 1, 2010

Run Eclipse UI Test Plug-in without Eclipse Workbench Window Bothering You

In Test Driven Development it happens you need to run Eclipse UI Tests and keep working at the same time. You can start tests but then you'll get Eclipse Workbench window annoying you especially if you have several JUnit Test Suites to run. Eclipse Workbench Window will pop up and grab input focus for each new suite and that's really annoying. After fiddling with my linux I found several ways to solve this issue:
  1. Do not run tests at all, which is not acceptable for TDD;
  2. Run only Eclipse core tests without workbench window, which is not enough to make tests results reliable;
  3. Create new display and force test session to use it.
Firs option isn't reasonable at all. Second is good enough for non UI applications, but has no value for opposite ones. Third is not for none UI applications, but is the best for UI ones. Fortunately, it is amazingly easy to create new display and redirect your tests execution to it. You have couple options to consider for creating new display :
  1. start vncserver
  2. create virtual buffer using Xvfb
After you have created new display just pass display number as local environment variable in your command line like DISPLAY=:N ${your-command-line-here} and you'll never see your eclipse workbench window :) But if you need to follow tests for a while or just check what is going on from time to time you can use vncviewer or xwud for first or second option accordingly.

Friday, March 26, 2010

How to Use HSQL Database With JBoss Tools Right Way

You have several options to start HSQL. I would choose from couple described below:

1. In process - by pointing out to local folder during creating DTP Connection Profile

2. Server - by starting it outside eclipse using command line and then create DTP Connection Profile with local server

In Process Option

If you use "in process" option you have to be aware that it is not enough just point out folder where your database is located in connection properties. You have to add one more segment to it with database name or your DB will be empty (see explanation below).

For example you have HSQL DB somewhere on disk with name "employee". Im my case I have it downloaded from here and just moved all files to local directory /home/eskimo/db/employee. So I have in this folder structure showed below (ignore employee.lck file it will be created after first "In process" start and not needed initially)

hsql-db-structure.png

I assume you you have the same but you need to correct all paths "/home/eskimo/db/employee" and database name "employee" with yours real values.

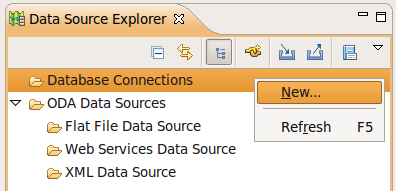
Then create "Database Connection" in DTP "Data Source Explorer" View by selecting "New..." from context menu on "Database Connections" node like

hsql-new-conn-1.png

Then select "HSQLDB" connection type and enter DB name as "employee"

hsql-new-conn-2.png

Then I assume you already have configured HSQL JDBC Driver and all what you need to do is enter database name again as "employee" and select its location. After that one magic step is needed (it could be DTP issue). Add one more segment "/employee" in "Database Location" like it shown below. Do not forget to clear "Connect when wizard completes" checkbox because it will start "In Process" HSQL after wizard is finished and create employee.lck file in your database folder. This file will be the reason Seam why Seam Entity Generation wizard will fail during execution. Use 'Optional' tab to define hsqldb.lock_file=false to fix this problem like it is shown below

hsql-new-conn-3.png

dtp-connection-props.png

Press Finish and check the "employee" node created under "Database Connections".

Now you're ready to create Seam Web project using "New Seam Web Project" wizard like it is shown below (it shows only first and last steps because all other steps I left unchanged with default values).

seam-new-1.png

Then comes screens I left unchanged and finally you get to last one with seam configuration. You should have seam 2.1 configured and all what you need is to fill Database properties like it shown below and press "Finish".

seam-new-2.png

After wizard is finished you should see two projects prj1 and prj1-test in your workspace. Now to be ready for entities reverse engineering from your database you need to be sure hsqldb.jar is available in your Server classpath container or in prj1/WebContent/WEB-INF/lib folder. If you don't have hsqldb.jar there "Generate Seam Entities" will fail with ClassNotFound Exception, because it will not be able to find HSQL JDBC driver class.

Now you're ready to go. Switch to Seam Perspective and select "Generate Seam Entiies" from context menu on prj1 project

seam-gen-entities-1.png

Leave first step unchanged like it shown below and press "Next"

seam-gen-entities-2.png

On second step press "Refresh" button and make sure it shows all tables form database as it shown below. If there are no tables most likely HSQL connection is not correctly configured. To generate Seam Entities and xhtml pages press "Finish".

seam-gen-entities-3.png

You should get bunch of generated classes in source folder and pages in WebContent.

Server Option

You need to start HSQL as Server first using command line. Open console and change your directory to database directory like

$ cd /home/eskimo/db/employee

Then start HSQL server in Server Mode like

$java -cp /home/eskimo/Java/hsqldb/lib/hsqldb.jar org.hsqldb.Server

You should see output like

[Server@19106c7]: [Thread[main,5,main]]: checkRunning(false) entered [Server@19106c7]: [Thread[main,5,main]]: checkRunning(false) exited [Server@19106c7]: Startup sequence initiated from main() method [Server@19106c7]: Loaded properties from [/home/eskimo/db/employee/server.properties] [Server@19106c7]: Initiating startup sequence... [Server@19106c7]: Server socket opened successfully in 8 ms. [Server@19106c7]: Database [index=0, id=0, db=file:employee, alias=] opened sucessfully in 690 ms. [Server@19106c7]: Startup sequence completed in 699 ms. [Server@19106c7]: 2010-02-25 13:37:54.016 HSQLDB server 1.8.1 is online [Server@19106c7]: To close normally, connect and execute SHUTDOWN SQL [Server@19106c7]: From command line, use [Ctrl]+[C] to abort abruptly

It starts by default in silent mode. If you want to see what's going one just change property server.silent in server.properties file from true to false and your output will look like

[Server@34a1fc]: [Thread[main,5,main]]: checkRunning(false) entered [Server@34a1fc]: [Thread[main,5,main]]: checkRunning(false) exited [Server@34a1fc]: Startup sequence initiated from main() method [Server@34a1fc]: Loaded properties from [/home/eskimo/db/employee/server.properties] [Server@34a1fc]: [Thread[main,5,main]]: start() entered [Server@34a1fc]: [Thread[HSQLDB Server @34a1fc,5,main]]: run() entered [Server@34a1fc]: Initiating startup sequence... [Server@34a1fc]: [Thread[HSQLDB Server @34a1fc,5,main]]: server.tls=false [Server@34a1fc]: [Thread[HSQLDB Server @34a1fc,5,main]]: server.port=1701 [Server@34a1fc]: [Thread[HSQLDB Server @34a1fc,5,main]]: server.trace=false [Server@34a1fc]: [Thread[HSQLDB Server @34a1fc,5,main]]: server.database.0=employee [Server@34a1fc]: [Thread[HSQLDB Server @34a1fc,5,main]]: server.restart_on_shutdown=false [Server@34a1fc]: [Thread[HSQLDB Server @34a1fc,5,main]]: server.no_system_exit=false [Server@34a1fc]: [Thread[HSQLDB Server @34a1fc,5,main]]: server.silent=false [Server@34a1fc]: [Thread[HSQLDB Server @34a1fc,5,main]]: server.default_page=index.html [Server@34a1fc]: [Thread[HSQLDB Server @34a1fc,5,main]]: server.address=0.0.0.0 [Server@34a1fc]: [Thread[HSQLDB Server @34a1fc,5,main]]: server.dbname.0= [Server@34a1fc]: [Thread[HSQLDB Server @34a1fc,5,main]]: server.root=. [Server@34a1fc]: [Thread[HSQLDB Server @34a1fc,5,main]]: openServerSocket() entered [Server@34a1fc]: [Thread[HSQLDB Server @34a1fc,5,main]]: Got server socket: ServerSocket[addr=0.0.0.0/0.0.0.0,port=0,localport=1701] [Server@34a1fc]: Server socket opened successfully in 4 ms. [Server@34a1fc]: [Thread[HSQLDB Server @34a1fc,5,main]]: openServerSocket() exiting [Server@34a1fc]: [Thread[HSQLDB Server @34a1fc,5,main]]: openDatabases() entered [Server@34a1fc]: [Thread[HSQLDB Server @34a1fc,5,main]]: Opening database: [file:employee] [Server@34a1fc]: Database [index=0, id=0, db=file:employee, alias=] opened sucessfully in 696 ms. [Server@34a1fc]: [Thread[HSQLDB Server @34a1fc,5,main]]: openDatabases() exiting [Server@34a1fc]: Startup sequence completed in 701 ms. [Server@34a1fc]: 2010-02-25 13:41:49.516 HSQLDB server 1.8.1 is online [Server@34a1fc]: To close normally, connect and execute SHUTDOWN SQL [Server@34a1fc]: From command line, use [Ctrl]+[C] to abort abruptly [Server@34a1fc]: [Thread[main,5,main]]: start() exiting

Starting HSQL as Servers you should not worry about employee.lck anymore and can leave "Connect when wizard completes" checkbox selected during creating new HSQL Database Connection, but Database Location should be changed to hsql://localhost:1701 in second step of "New Database Connection" Wizard like

hsql-new-conn-server-mode.png

Monday, January 4, 2010

Logitech Travel Mouse issues under Ubuntu 9.10 (Karmic)

There are many issues related to Logitech blue-tooth mouse and other blue-tooth devices. It's been several months I have problems with my Logitech cordless laser mouse under Ubuntu 9.10 (karmic). It just stopped working after waking up my Lenovo T61 and I was not able to get it working without rebooting. Sure it is Ok when you use your computer only for browsing and there is nothing to restart but browser, but it is quite annoying if you have to restore your development environment that includes several heavy applications like eclipse with around 100 plug-in projects.

Simple google search gives around 15 000 results. Those results don't contain exact solution to solve my problem and I had to read a lot of them before I found couple comments that gave me a way to get my mouse back without required reboot.

After removing all bluetooth related software and installing bluez-gnome by

$sudo apt-get install bluez-gnome
I found exact steps to restore my mouse after waking up.

1. Modify hcid.conf file: change 'security' option to 'auto' and Add your device as

device MAC_ADRESS {
    name "Bluetooth Laser Travel Mouse"
}
where MAC_ADRESS is MAC address for your mouse which is usually printed on mouse

2. Press 'connect' button on mouse

3. Execute

$sudo hcitool inq
and you'll get something like
00:07:61:DE:7B:29 clock offset: 0x3389 class: 0x002580

4. Execute

sudo hidd --search
and after it says
Connecting to device 00:07:61:DE:7B:29
you'll get your mouse back